Making a Insta Filter CLI tool
Problem Statement -
Create a python based CLI tool which-
- takes input of a photo
- This photo’s format should not matter and it should be able to convert it from one format to another
- Applied Pre Determined Filters which include-
- Blur
- Greyscale
- Sepia
- Making a pencil Sketch of the image
- Dynamically show all of the changes to the image
- Save the image to a destination
Walkthrough of the Solution-
Taking Input form the user
This is in the beginning of the program and is relatively easy what i will do is ask the user for the path to the image and if the image in the same directory then just give the name with the extension
1
2
3
4
5
6
7
8
9
10
11
import cv2 as cv
import numpy as np


src = input("Enter the path to the image: ")

img = cv.imread(src)

cv.imshow("Image Preview",img)
cv.waitKey(0)
cv.destroyAllWindows()
From here on how the OpenCV library will be referred to as cv not cv2
The last lines -
- cv.waitkey(0) ensures the window does not close before a key is pressed.
- cv.destroyAllWindows() ensures all instances of the image are closed.
We will be using this image
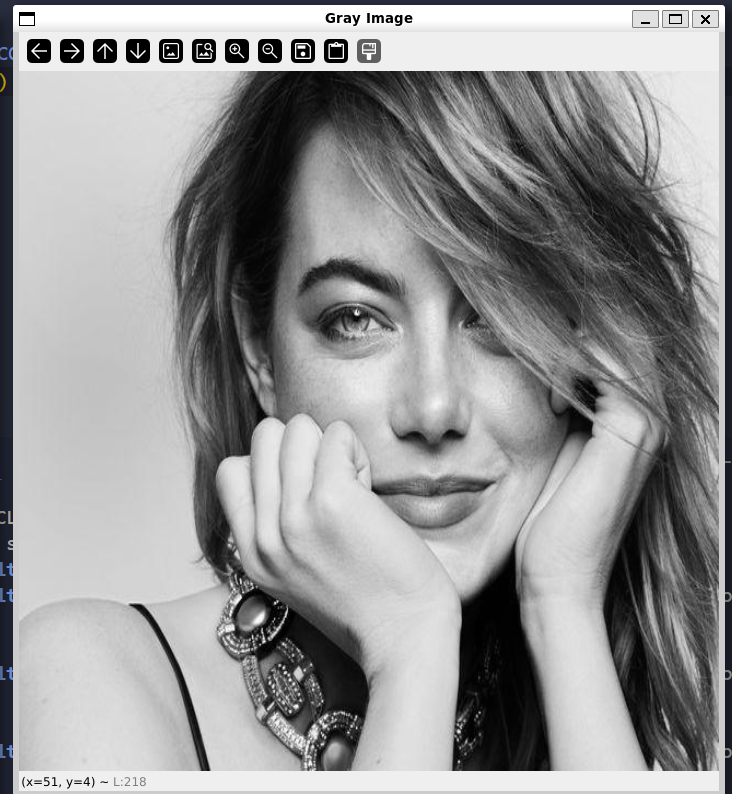
Okay lets try and implement the easiest to implement functionality which is the greyscale feature
Adding the Greyscale Feature-
We will be using the cvtColor() function in OpenCV for converting a coloured image to greyscale.
The images in OpenCV are stored in BGR (Blue Green Red) format instead of the common RGB format.
The basic syntax in python is
1
gray_image = cv2.cvtColor(source_image, cv2.COLOR_BGR2GRAY)
source_image: This is your original image, which OpenCV loads by default in BGR (Blue, Green, Red) format. This image is a 3D array, with dimensions for height, width, and 3 color channels (B, G, R).cv2.COLOR_BGR2GRAY: This is a specific conversion code (a flag) that tellscvtColorexactly what conversion you want to perform. It instructs the function to use the standard formula for BGR to grayscale conversion.gray_image: The output is a new 2D array with only a height and width. The third dimension (for color) is gone because each pixel is now represented by just one intensity value (a shade of gray) instead of three color values.
BGR to Greyscale formula-
The conversion isn’t just a simple average of the B, G, and R values. Instead, cv2.cvtColor() uses a weighted average that mimics how the human eye perceives brightness. Our eyes are most sensitive to green, less to red, and least to blue.
So this means the you could easily use nested for loops for go through every pixel in the array and manually make it greyscale
1
2
3
4
5
6
7
8
9
10
11
12
13
14
15
16
17
18
19
20
21
for i in range (height):
	for j in range (width):
    	# Calculate the weighted sum of color components

        # Note: BGR is usually 0=B, 1=G, 2=R in OpenCV

        new_pixel_float = (0.144)*img[i][j][0] + (0.587)*img[i][j][1] + (0.299)*img[i][j][2]

        # Clamp the value to a maximum of 255 and then convert to integer

        clamped_pixel = int(min(255, new_pixel_float))

        # Create a new 3-channel array where BGR are all the grayscale value

        # This keeps the image a 3-channel array for correct display

        grayscale_pixel = np.array([clamped_pixel, clamped_pixel, clamped_pixel], dtype=np.uint8)

        # Assign the new grayscale pixel back to the image

        img[i][j] = grayscale_pixel
Output-
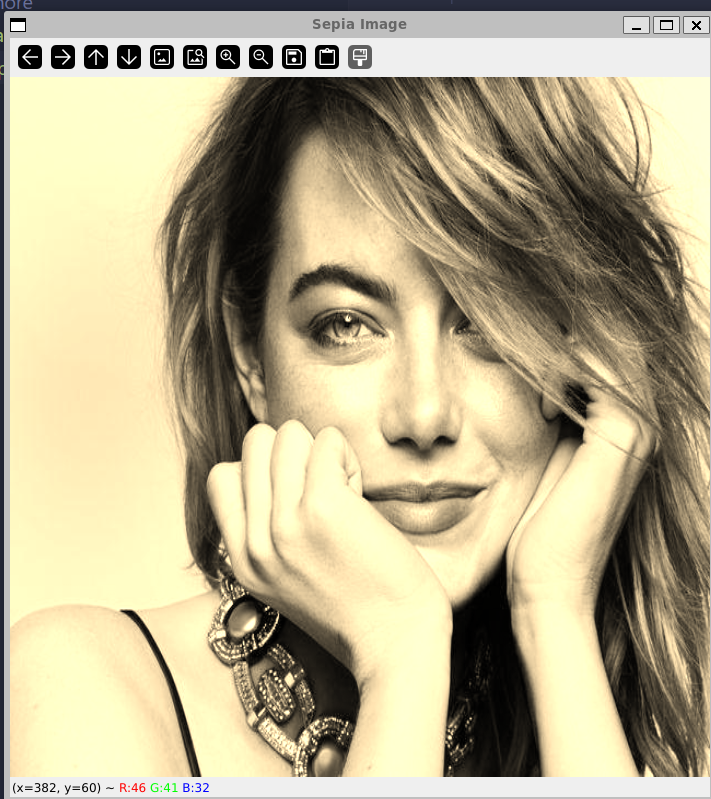
Adding a Sepia FIlter-
Well my problem statement says now i need to add a sepia filter so lets first learn in the words of an LLM what it a sepia filter
A sepia filter gives your images a warm, reddish-brown tone, making them look like antique, faded photographs from the late 19th or early 20th century. It’s an aesthetic effect that adds a sense of nostalgia to modern digital images.
Here is a wikipedia article abut the sepia filter
okay so now that we know what is it how do we mathematically implement it
Mathematics-
to get that warm brown tint, we can’t just convert to grayscale. Grayscale takes three color values (Red, Green, and Blue) and outputs one intensity value.
A sepia filter, on the other hand, takes three color values as input and outputs three new color values. Each new channel (newRed, newGreen, newBlue) is a specific weighted average of all three original channels.
For any given pixel with original values : \((O_R,O_G,O_B)\) The standard sepia calculation is:
\(\text{newRed} = (O_R \times 0.393) + (O_G \times 0.769) + (O_B \times 0.189)\) \(\text{newGreen} = (O_R \times 0.349) + (O_G \times 0.686) + (O_B \times 0.168)\) \(\text{newBlue} = (O_R \times 0.272) + (O_G \times 0.534) + (O_B \times 0.131)\)
One last rule: Since the maximum value for a color channel is 255, if any of these formulas spit out a number higher than that, we just clip it (or cap it) at 255.
The 2 ways of implementation Loops VS Vectorisation-
You might be tempted to just write a for loop to apply this math.
The Slow Way (Don’t do this!)
The “intuitive” way to implement this is to loop through every single pixel in the image, get its R, G, and B values, do the math, and save the new pixel.
1
2
3
4
5
6
7
8
9
10
11
12
13
# This is the SLOW way, just for demonstration
for y in range(height):
    for x in range(width):
        # 1. Get original pixel
        (b, g, r) = image[y, x]

        # 2. Apply the math
        newR = (r * 0.393) + (g * 0.769) + (b * 0.189)
        newG = (r * 0.349) + (g * 0.686) + (b * 0.168)
        newB = (r * 0.272) + (g * 0.534) + (b * 0.131)

        # 3. Save new pixel
        image[y, x] = (newB, newG, newR)
Why not use this Python is an “interpreted” language, which makes it very slow at running loops. For a single 4K image (around 8.3 million pixels), this code would run those three formulas millions of times inside the slow Python interpreter. So basically it is a 🗑️ way of implementation.
The Fast Way (Vectorization 🚀)
Vectorization is the secret weapon of libraries like NumPy and OpenCV.
Instead of operating on one pixel at a time, we perform the operation on the entire image matrix at once. The math I showed you is a linear transformation, which can be represented by a 3x3 matrix.
\[\begin{bmatrix} \text{newBlue} \\ \text{newGreen} \\ \text{newRed} \end{bmatrix} = \begin{bmatrix} 0.131 & 0.534 & 0.272 \\ 0.168 & 0.686 & 0.349 \\ 0.189 & 0.769 & 0.393 \end{bmatrix} \begin{bmatrix} O_B \\ O_G \\ O_R \end{bmatrix}\]If you are not familiar with linear transformations then watch this [video] from khan academy-
We can just tell OpenCV: “Take this 3x3 matrix and apply it to every BGR pixel in the image.”
OpenCV then hands this single, simple command off to its highly optimized, pre-compiled C/C++ backend, which executes the operation blazingly fast outside of Python.
Let me give you an analogy imagine each pixel in the 4K image is a grocery item then -
Looping = Paying for 8 million groceries one by one with cash.
Vectorization = Paying for all 8 million items with a single credit card tap.
Here is the vectorized code written as a function for my program-
1
2
3
4
5
6
7
8
9
10
11
12
13
14
15
16
17
18
19
20
21
22
23
24
25
26
27
28
29
30
31
32
33
34
35
def sepia (image):

    # 1. Define the Sepia transformation matrix (

    # These values are arranged for BGR input to BGR output

    sepia_matrix = np.array([

        [0.131, 0.534, 0.272],  # -> Output Blue

        [0.168, 0.686, 0.349],  # -> Output Green

        [0.189, 0.769, 0.393]   # -> Output Red

    ])

    # 2. Apply the transformation

    # cv2.transform multiplies every pixel in 'image' by the 'sepia_kernel'

    sepia_image = cv.transform(image, sepia_matrix)

    # 3. Clip values to the 0-255 range

    # The math might create values > 255, so we cap them.

    sepia_image = np.clip(sepia_image, 0, 255)

    # 4. Convert the image back to the 8-bit integer type

    # Image data must be integers (0-255), not decimals

    sepia_image = np.uint8(sepia_image)

    return sepia_image
Output-
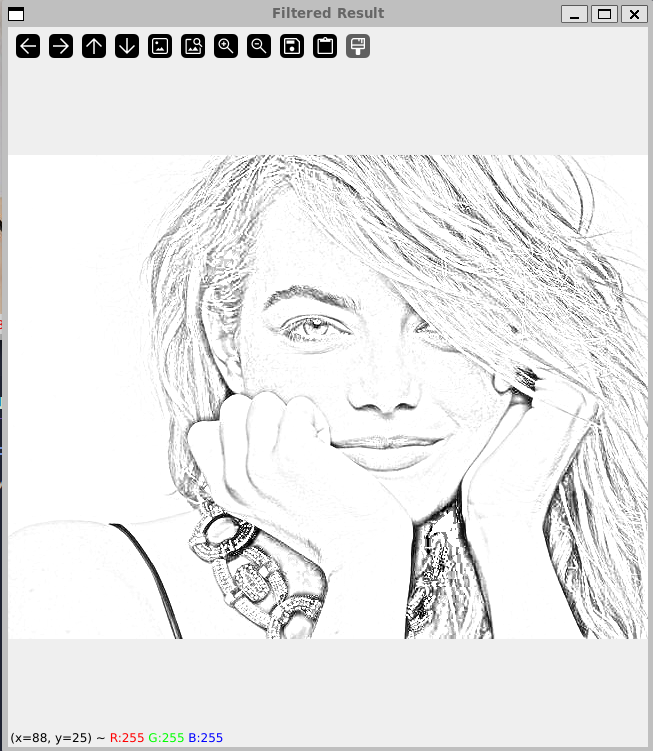
Pencil Sketch effect-
Again we will turn to our trusty LLM to explain what the pencil sketch is-
The goal of a pencil sketch is to get rid of color and most of the “shading,” leaving only the dark edges and lines on a white “paper” background.
The secret is a Photoshop blend mode called “Color Dodge.” We’re going to build that effect from scratch.
The 4-Step “Recipe” for a Pencil Sketch
First, let’s review the high-level plan. A pencil sketch is just a clever 4-step process that combines two layers:
Grayscale: We don’t need color. This will be our “base layer” of the drawing.
Blur & Invert: We take the grayscale image, blur it, and then invert it. This will be our “blending layer.”
Color Dodge (The Magic): We mathematically “dodge” the base layer with the blending layer.
The Result: This “dodging” process blows out all the flat areas to pure white (the “paper”) and leaves only the dark lines (the “pencil strokes”).
Let’s tear it all apart. We’re going to build this effect from scratch, using slow, manual for loops to understand every single step. We’ll even write our own simple Gaussian Blur! Only after we understand the “why” will we use the fast, optimized OpenCV functions.
Step -1 - Greyscale -
I will not explain it all again just go to the the greyscale section to understand all the math.
Here is the modified code for this process:
1
2
3
4
5
6
7
8
9
10
11
12
13
14
15
16
17
import cv2
import numpy as np

# Load the image
image = cv2.imread('your_image.jpg')
# Make a copy to hold our final sketch (it will be 1-channel grayscale)
sketch = np.zeros(image.shape[:2], dtype=np.uint8)

# ---
# Step 1: Convert to Grayscale
# ---
print("Step 1: Converting to Grayscale...")
gray_image = cv.cvtColor(image, cv.COLOR_BGR2GRAY)

print("Grayscale conversion complete.")
cv2.imshow('1 - Grayscale', gray_image)
cv2.waitKey(0)
Step 2 & 3: The Gaussian Blur
What is a Blur?
A blur is a weighted average of a pixel and its neighbors. A “box blur” just averages all pixels equally. A Gaussian blur is smarter: it gives more weight to the center pixel and less weight to pixels that are farther away. This creates a much smoother, more natural blur.
This “set of weights” is stored in a small matrix called a kernel.
The Math: The Gaussian Function
The weights for the kernel are calculated using this (intimidating but simple) 2D Gaussian function:
- $(x, y)$ is the position of the neighbor (e.g., $(-1, -1)$ for the top-left).
- $\sigma$ (sigma) is the “standard deviation,” which is just a fancy way of saying “how much do you want to blur?” A small sigma gives a sharp kernel; a large sigma gives a blurry one. For a simple 3x3 kernel (with $\sigma = 1$), the math gives us these weights:
(We divide by 16, the sum of all values, to “normalize” it. This ensures the image doesn’t get brighter or darker.)
How We Apply It: “Convolution” “Convolution” is the process of sliding this kernel over every single pixel of the image.
- Center the kernel on a pixel.
- Multiply each neighbor pixel by the kernel weight it’s overlapping.
- Sum up all the results.
- This sum is the new value for the center pixel.
Python Code-
1
2
3
4
5
6
7
8
9
10
11
12
13
14
15
16
17
18
19
20
21
22
23
24
25
26
27
28
29
30
31
32
33
34
35
36
37
38
39
40
41
42
43
44
45
46
47
48
49
50
# Create an empty NumPy array to store the blurred result
blurred_image = np.zeros(gray_image.shape, dtype=np.uint8)

# Define our 3x3 Gaussian Kernel
kernel = np.array([
    [1, 2, 1],
    [2, 4, 2],
    [1, 2, 1]
], dtype=np.float32)

# Normalize the kernel (sum of all values is 16) so the image
# doesn't get brighter or darker
kernel = kernel / 16.0

# Get the dimensions of the image and the kernel
height, width = gray_image.shape
k_size = kernel.shape[0]
k_half = k_size // 2  # This will be 1 for a 3x3 kernel

# --- Start of the manual convolution loop ---

# We must skip the 1-pixel border around the image because
# the 3x3 kernel cannot be centered on the edge pixels.
for y in range(k_half, height - k_half):
    for x in range(k_half, width - k_half):

        # This will store the new pixel value
        weighted_sum = 0.0

        # Now, loop over the 3x3 kernel
        for i in range(k_size):
            for j in range(k_size):

                # Get the coordinates of the neighbor pixel
                neighbor_y = y - k_half + i
                neighbor_x = x - k_half + j

                # Get the value of the neighbor pixel
                pixel_value = gray_image[neighbor_y, neighbor_x]

                # Get the weight from the kernel
                weight = kernel[i, j]

                # Multiply the neighbor's value by the weight and add it to the sum
                weighted_sum += pixel_value * weight

        # After checking all 9 neighbors, the final sum is the new
        # value for the center pixel (y, x)
        blurred_image[y, x] = int(weighted_sum)
Vectorized Way-
This single line replaces the entire manual “convolution” for loop. It takes the grayscale image and blurs it.
1
2
# (21, 21) is the kernel size. Larger numbers = more blur.
blurred_image = cv2.GaussianBlur(gray_image, (21, 21), 0)
Step 3 & 4: Invert the Blur and Dodge
This is where the entire effect comes together. We now have our two layers:
gray_image: Our “base” layer.blurred_image: Our “blend” layer.
The process is a digital recreation of a “Color Dodge” blend mode.
Step 3: Invert the Blurred Image
First, we take our blurred_image and invert it. This is a simple subtraction from 255.
inverted_blurred = 255 - blurred_image
This creates our final “blending” mask. Think about what this does:
Areas that were lightly blurred (like flat, bright walls, e.g., value 220) become very dark (e.g., value 35).
Areas that were heavily blurred (like the smudged edges, e.g., value 80) become light gray (e.g., value 175).
This inverted_blurred image is the crucial denominator for our next step.
Step 4: The “Color Dodge” (The Divide Operation)
This is the magic. We now divide our original gray_image (the base) by the inverted_blurred (the blend).
The “Color Dodge” formula is: Result = (Base Layer / Inverted Blend Layer) * 256
Let’s see why this works by looking at two different pixels:
1. A Pixel on a Flat, Bright Wall:
gray_imagepixel is high (e.g., 220).blurred_imagepixel is also high (e.g., 220).inverted_blurred(our denominator) is255 - 220 = 35(a low number).Math:
(220 / 35) * 256 = 6.28 * 256 = 1608.0Result: The value
1608.0is way over 255. Like any image, it gets clipped to 255 (pure white). This is how we get our “paper” background.
2. A Pixel on a Dark Edge (a Hairline):
gray_imagepixel is low (e.g., 30).blurred_image(which “smudged” the line) is a bit lighter (e.g., 80).inverted_blurred(our denominator) is255 - 80 = 175(a high number).Math:
(30 / 175) * 256 = 0.17 * 256 = 43.5Result: The value is 43. This is a dark gray. This is our “pencil line.”
The “Zero Division” Trap:
What happens if a pixel in blurred_image is 255?
Our denominator becomes
255 - 255 = 0.We can’t divide by zero!
The Rule: In this specific operation, any division by zero is defined to result in 255 (pure white). This makes sense—if the blurred area is already pure white, the final “paper” should also be white. The
cv2.divide()function handles this for us automatically.
Python Code-
1
2
3
4
5
6
7
8
9
10
11
12
13
14
15
16
17
18
19
20
21
22
23
24
25
26
27
28
29
30
31
32
33
# ---
# Step 3 & 4: Invert the Blur and Dodge
# ---
sketch_image = np.zeros(image.shape[:2], dtype=np.uint8)

for y in range(height):
for x in range(width):
# Get the pixel from both layers
base_pixel = gray_image[y, x]
blend_pixel = blurred_image[y, x]

# Invert the blend layer pixel
inverted_blend = 255 - blend_pixel

# Check for the Zero Division TRAP
if inverted_blend == 0:
# Set to pure white
sketch_image[y, x] = 255
else:
# Apply the dodge formula
# We use 256.0 to force float division
new_value = (base_pixel / inverted_blend) * 256.0

# Clip the value to be max 255
if new_value > 255:
new_value = 255

sketch_image[y, x] = int(new_value)

print("Sketch complete!")
cv2.imshow('3 - Final Sketch', sketch_image)
cv2.waitKey(0)
cv2.destroyAllWindows()
Vectorized Way-
1
2
3
4
5
# This is our (255 - blurred_image)
inverted_blurred = 255 - blurred_image
# This one function replaces our manual dodge loop
# It also handles the divide-by-zero error for us!
pencil_sketch = cv2.divide(gray_image, inverted_blurred, scale=256.0)
Completed Code-
1
2
3
4
5
6
7
8
9
10
11
12
13
14
15
16
17
18
19
20
21
22
23
24
25
26
27
28
29
30
31
32
33
34
35
36
37
import cv2 as cv
import numpy as np

image = cv.imread('your_image.jpg')
if image is None:
print("Error: Could not load image.")
else:
# --- Start of the pencil sketch logic ---

# Step 1: Convert the image to grayscale
gray_image = cv.cvtColor(image, cv.COLOR_BGR2GRAY)

# Step 2: Apply a Gaussian blur
# We use (21, 21) for a nice, soft blur.
# This replaces our entire manual convolution!
blurred_image = cv.GaussianBlur(gray_image, (21, 21), 0)

# Step 3: Invert the blurred image
# This is our (255 - blend_layer)
inverted_blurred = 255 - blurred_image

# Step 4: Divide the grayscale by the inverted-blurred
# This is our "Color Dodge"
# cv2.divide handles the /0 error and scaling for us!
pencil_sketch = cv.divide(gray_image, inverted_blurred, scale=256.0)


# --- End of the logic ---

# Display the original and the sketch
cv.imshow('Original Image', image)
cv.imshow('Pencil Sketch', pencil_sketch)

print("Press any key to close the windows...")
cv.waitKey(0)
cv.destroyAllWindows()
Output-
The code in the program has to work inside a larger system. All the other filters (Sepia, Blur, Grayscale) take a 3-channel BGR image as input and also return a 3-channel BGR image.
To make the pencil sketch function compatible, I added one final step:
1
2
3
4
5
6
# The algorithm is the same...
pencil_sketch = cv.divide(gray_image, inverted_blurred, scale=256.0)

# ...but then we add this line:
pencil_sketch_3_channel = cv.cvtColor(pencil_sketch, cv.COLOR_GRAY2BGR)
return pencil_sketch_3_channel
This final line converts the 1-channel grayscale sketch back into a 3-channel BGR image. (The B, G, and R values for each pixel are just copied from the single grayscale value, so (80) becomes (80, 80, 80)).
Why the Change?
Compatibility.
By ensuring all the functions in the tool return a 3-channel BGR image, we can:
Display it:
cv.imshow()can handle both, but it’s cleaner to be consistent.Save it: The save logic can use the original file extension (like
.jpg) without errors.Chain Filters: This is the most important reason. If the pencil sketch function returned a 1-channel image, and you later tried to apply the “Sepia” filter to it, the program would crash. The Sepia filter (
cv.transform) requires a 3-channel image to do its matrix math.
Finalizing the Program -
The biggest change is the heart of our new program. Instead of just running from top to bottom and then quitting, our new script runs inside a while True: loop.
1
2
3
4
5
6
7
8
9
10
11
12
13
14
15
16
17
18
19
20
21
22
23
24
def main():
    # --- 1. Load Image (Happens ONCE) ---
    original_image, file_extension = load_image_safely()

    # --- 2. Main Filter Loop ---
    while True:
        print_menu()
        choice = input("Enter your choice: ").strip().lower()

        if choice == '1':
            #... apply grayscale ...
        elif choice == '2':
            #... apply blur ...
        elif choice == '3':
            #... apply sepia ...
        elif choice == '4':
            #... apply pencil sketch ...
        elif choice == 'q':
            print("Exiting. Goodbye!")
            break # This is how we exit the loop!
        else:
            print("Invalid choice. Please try again.")

        # ... (display and save logic here) ...
This is the standard architecture for almost any interactive application (like a video game or a text editor). The program just “sits and waits” in this loop for you to tell it what to do.
Why Ask for the Image First?
Notice that we load the image before the main loop starts. This is a huge user experience win. We don’t want to be asked for the image path every single time we want to try a new filter.
We load it once, store it in original_image, and then pass that same image to whichever filter function we want.
Everything Becomes a Reusable Function
This is the key to clean code. Instead of having all our filter logic just sitting in the file, we’ve organized each one into its own well-named function:
apply_grayscale(image)apply_blur(image)apply_sepia(image)apply_pencil_sketch(image)
Each function takes one argument (the original image) and returns the new filtered image. This makes our main loop incredibly clean and readable.
Smart Saving
We also added a “save” feature. But how do we know if we should save as a .jpg, .png, or .bmp?
Easy: we steal the extension from the original file.
We use Python’s built-in os library to do this right when we load the image:
1
2
3
4
5
6
import os

# This happens in our new image-loading function
image_path = "path/to/my_photo.png"
_, file_extension = os.path.splitext(image_path)
# file_extension now holds ".png"
Then, when the user wants to save, we just ask for the new name and add that original extension back on.
1
2
3
4
# This is inside our save logic
new_name = input(f"Enter the new file name: ")
final_name = f"{new_name}{file_extension}" # e.g., "my_new_sketch.png"
cv.imwrite(final_name, result_image)
The complete code-
1
2
3
4
5
6
7
8
9
10
11
12
13
14
15
16
17
18
19
20
21
22
23
24
25
26
27
28
29
30
31
32
33
34
35
36
37
38
39
40
41
42
43
44
45
46
47
48
49
50
51
52
53
54
55
56
57
58
59
60
61
62
63
64
65
66
67
68
69
70
71
72
73
74
75
76
77
78
79
80
81
82
83
84
85
86
87
88
89
90
91
92
93
94
95
96
97
98
99
100
101
102
103
104
105
106
107
108
109
110
111
112
113
114
115
116
117
118
119
120
121
122
123
124
125
126
127
128
129
130
131
132
133
134
135
136
137
138
139
140
141
142
143
144
145
146
147
148
149
150
151
152
153
154
155
156
157
158
159
160
161
162
163
164
165
166
167
168
169
170
171
172
173
174
175
176
177
178
179
180
181
182
183
184
185
186
187
188
189
190
191
192
193
194
195
196
197
198
199
200
201
202
203
204
205
206
207
208
209
210
211
212
213
214
215
216
217
218
219
220
221
222
223
224
225
226
227
228
229
230
231
232
233
234
235
236
237
238
239
240
241
242
243
244
245
246
247
248
249
250
251
252
253
254
255
256
257
258
259
260
261
262
263
264
265
266
267
268
269
270
271
272
273
274
275
276
277
278
279
280
281
import cv2 as cv

import numpy as np

import os


def apply_grayscale(image):

    """

    Applies a grayscale filter and converts it back to 3 channels.

    """

    gray = cv.cvtColor(image, cv.COLOR_BGR2GRAY)

    # Convert back to 3 channels so it can be displayed

    # and processed by other filters if needed

    gray_3_channel = cv.cvtColor(gray, cv.COLOR_GRAY2BGR)

    return gray_3_channel


def apply_blur(image):

    """

    Applies a strong Gaussian blur.

    """

    # Using a 21x21 kernel for a noticeable blur

    blurred = cv.GaussianBlur(image, (21, 21), 0)

    return blurred


def apply_sepia(image):

    """

    Applies a sepia filter using a kernel transformation.

    """

    # Define the sepia filter kernel (for BGR order)

    sepia_kernel = np.array([

        [0.131, 0.534, 0.272],  # -> newBlue

        [0.168, 0.686, 0.349],  # -> newGreen

        [0.189, 0.769, 0.393]   # -> newRed

    ])

    # Apply the transformation

    sepia_image = cv.transform(image, sepia_kernel)

    # Clip values to the 0-255 range

    sepia_image = np.clip(sepia_image, 0, 255)

    # Convert back to 8-bit unsigned integers

    sepia_image = np.uint8(sepia_image)

    return sepia_image


def apply_pencil_sketch(image):

    """

    Applies a pencil sketch effect using the "Dodge and Burn" technique.

    """

    # Step 1: Convert to grayscale

    gray_image = cv.cvtColor(image, cv.COLOR_BGR2GRAY)

    # Step 2: Invert the grayscale image

    inverted_gray = 255 - gray_image

    # Step 3: Apply a blur to the inverted image

    blurred = cv.GaussianBlur(inverted_gray, (21, 21), 0)

    # Step 4: Invert the blurred image

    inverted_blurred = 255 - blurred

    # Step 5: Divide the grayscale image by the inverted-blurred image

    # This is the "Color Dodge" step

    pencil_sketch = cv.divide(gray_image, inverted_blurred, scale=256.0)

    # Convert the 1-channel sketch back to 3-channels

    pencil_sketch_3_channel = cv.cvtColor(pencil_sketch, cv.COLOR_GRAY2BGR)

    return pencil_sketch_3_channel


def print_menu():

    """Prints the main menu options."""

    print("\n--- Image Filter Menu ---")

    print("1. Apply Grayscale Filter")

    print("2. Apply Blur Filter")

    print("3. Apply Sepia Filter")

    print("4. Apply Pencil Sketch Filter")

    print("q. Quit")

    print("-------------------------")


def main():

    """Main function to run the image filter tool."""

    # --- 1. Load Image ---

    original_image = None

    image_path = ""

    file_extension = ""


    while True:

        image_path = input("Please enter the full path to your image: ")

        original_image = cv.imread(image_path)

        if original_image is not None:

            # Get the file extension

            _, file_extension = os.path.splitext(image_path)

            print(f"Image '{os.path.basename(image_path)}' loaded successfully.")

            break

        else:

            print(f"Error: Could not load image from '{image_path}'. Please check the path and try again.")


    # --- 2. Main Filter Loop ---

    while True:

        print_menu()

        choice = input("Enter your choice (1, 2, 3, 4, or q): ").strip().lower()

        result_image = None

        if choice == '1':

            print("Applying Grayscale filter...")

            result_image = apply_grayscale(original_image.copy())

        elif choice == '2':

            print("Applying Blur filter...")

            result_image = apply_blur(original_image.copy())

        elif choice == '3':

            print("Applying Sepia filter...")

            result_image = apply_sepia(original_image.copy())

        elif choice == '4':

            print("Applying Pencil Sketch filter...")

            result_image = apply_pencil_sketch(original_image.copy())

        elif choice == 'q':

            print("Exiting the program. Goodbye!")

            break

        else:

            print("Invalid choice. Please select from the menu options.")

            continue # Skip the rest of the loop and show the menu again


        # --- 3. Display and Save Logic ---

        if result_image is not None:

            # Display the result

            print("Displaying original vs. filtered image.")

            print("Press any key in an image window to close and continue...")

            cv.imshow('Original Image', original_image)

            cv.imshow('Filtered Result', result_image)

            cv.waitKey(0)

            cv.destroyAllWindows()

            # Ask to save

            while True:

                save_choice = input("Do you want to save this new image? (y/n): ").strip().lower()

                if save_choice == 'y':

                    new_name = input(f"Enter the new file name (it will be saved as {file_extension}): ")

                    final_name = f"{new_name}{file_extension}"

                    try:

                        cv.imwrite(final_name, result_image)

                        print(f"Image successfully saved as '{final_name}'")

                        break

                    except Exception as e:

                        print(f"Error saving image: {e}")

                        break

                elif save_choice == 'n':

                    print("Image not saved.")

                    break

                else:

                    print("Invalid choice. Please enter 'y' for yes or 'n' for no.")


if __name__ == "__main__":

    main()